1. Add the Custom Object to Deduplicate Setup (mandatory)
- Go to the Deduplicate Setup page. At left, under 'Object Setup', click + Add Object.

- In the list that appears, select the Custom Object you wish to use. In this example, we are using the custom object 'Price'.
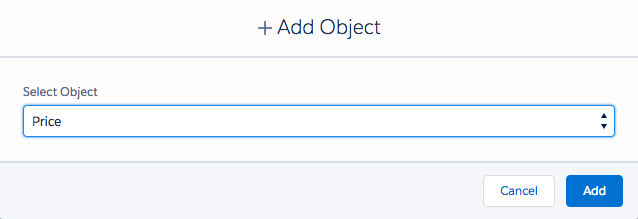
Click Add. The object will appear in the Object Setup.
Open the object in the Object Setup.
On its Scenarios tab, create one or more Scenarios to define a strategy for finding duplicate records.
On its <Object> Settings tab, define the settings for the object.
2. Create a Disable Duplicate Check checkbox field (mandatory)
The Disable Duplicate Check field is used to determine if a user can save a record that is created or edited in Deduplicate Entry, even though duplicate records have been detected.
- Go to Salesforce Setup > Object Manager.
- Open the custom object you want to use.
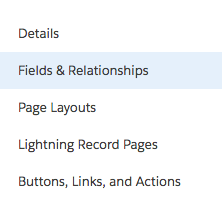
- Go to Fields & Relationships.
- At top right, click New.
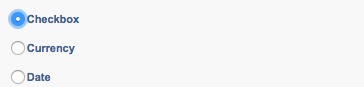
- At Data Type select 'Checkbox' and click Next.
- Enter the following settings:
Field Label: Disable Duplicate Check
Field Name: dc3DisableDuplicateCheck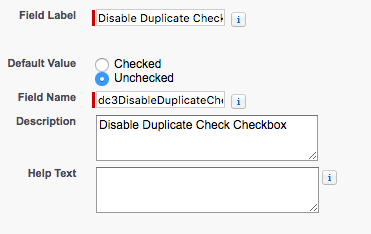
and click Next. - Depending on your Salesforce edition, the 'Establish field-level security' page will be show. If not, make sure to provide access to the field in the applicable profiles.
Decide which profile should have access to the Disable Duplicate Check field, and can therefore save records that are created or edited in Deduplicate Entry, even though duplicate records have been detected. Read more in Deduplicate Entry. - Click Next.
- Depending on your Salesforce edition, the 'Add to page layouts' page will be shown. It is not needed to actually display the Disable Duplicate Check field on the page layout, so you can untick the 'Add Field' box for the page layouts.
Click Save. The Disable Duplicate Check field has now been created.
3. Create the Apex Trigger (mandatory)
- Go to the Salesforce Setup > Object Manager.
- In the Object Manager, find the custom object you want to use and click on it.
- Under Details, copy the API Name of the Object.
- At left, go to the Triggers tab.
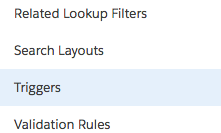
- At top right, click New.
- Replace all code in the box with the Apex Trigger code below. Make sure you replace *OBJECT_NAME* and *OBJECT_API_NAME* with the name and API name of your Custom Object.
The Test Class part should be created as an Apex Class (Salesforce Setup > Custom Code > Apex Classes)
Click here to watch a short video of this step.
Apex Trigger codetrigger dc3*OBJECT_NAME*Trigger on *OBJECT_API_NAME*(after delete, after insert, after undelete, after update, before insert, before update) { dupcheck.dc3Trigger triggerTool = new dupcheck.dc3Trigger(trigger.isBefore, trigger.isAfter, trigger.isInsert, trigger.isUpdate, trigger.isDelete, trigger.isUndelete); String errorString = triggerTool.processTrigger(trigger.oldMap, trigger.new); if (String.isNotEmpty(errorString)) { trigger.new[0].addError(errorString,false); } }
Test Class code// TEST CLASS BELOW @isTest private class TestDC*OBJECT_NAME* { static testMethod void Test_Insert*OBJECT_NAME*() { *OBJECT_API_NAME* p = new *OBJECT_API_NAME*(); // Add all fields which are required to insert the record. For example; // p.Name = 'Testprice'; // p.Price__c = 110.0; insert p; system.assertEquals(true, p.Id != null); } }
Apex Trigger exampletrigger dc3PriceTrigger on PRICE__c(after delete, after insert, after undelete, after update, before insert, before update) { dupcheck.dc3Trigger triggerTool = new dupcheck.dc3Trigger(trigger.isBefore, trigger.isAfter, trigger.isInsert, trigger.isUpdate, trigger.isDelete, trigger.isUndelete); String errorString = triggerTool.processTrigger(trigger.oldMap, trigger.new); if (String.isNotEmpty(errorString)) { trigger.new[0].addError(errorString,false); } }
Test Class example// TEST CLASS BELOW @isTest private class TestDCPrice { static testMethod void Test_InsertPrice() { Price__c p = new Price(); // Add all fields which are required to insert the record. For example; // p.Name = 'Testprice'; // p.Price__c = 110.0; insert p; system.assertEquals(true, p.Id != null); } } Click Save. You have now created the trigger.
4. Enable and create the Search Index (mandatory)
See Search Index for more detailed information about the Search Index.
- Go to Deduplicate Setup.
- On the left, under Object Setup, select your Custom Object.
- On the *Custom Object* Settings tab, enable the Search Index option.

- At top right, enable Show Advanced Settings.
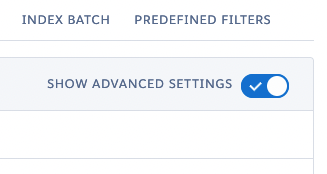
- Scroll down to the Index section and configure the Search Index settings.
See Search Index for more information.
- Go to the Index Batch tab.
- Click the Start button and select Create Search Index.
Choose to create the Search Index via Salesforce, via Plauti Desktop or Server, or via Plauti Cloud.
Creating the Search Index might take some time.
5. Create a custom Deduplicate Check button (optional)
The Deduplicate Check button lets you do a search for duplicates from the record page layout. After clicking the button, Plauti Deduplicate will search for duplicate records for the record you're working from. Creating the Deduplicate Check button is not mandatory.
- Navigate to the Salesforce Setup - Object Manager.
- In the Object Manager, find your custom object. Under 'Details' copy the 'API name' of the custom object.
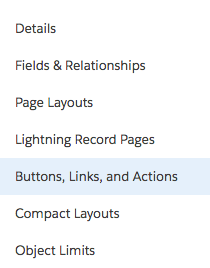
- Navigate to the 'Buttons, Links and Actions' menu.
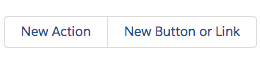
- On the top-right of the page, click 'New Button or Link'.
- Enter a Label and Name (e.g. Deduplicate Check and Deduplicate_Check).
At Description, enter a description so users know what the button does.
At Display Type, select 'Detail Page Button'.
At Behavior, select 'Display in existing window without sidebar or header'.
At Content Source, select 'URL'.
Keep 'Field Type' at <name of your custom object>.
In the code field, paste the following code:{!URLFOR('/apex/dupcheck__dc3Check?Id='+*API_NAME*.Id)}
In the code, replace *API_NAME* with the API name of your custom Object. In this example, we are using 'Price' as the custom Object, which has API name 'Price__c'.
- Click Save. Your Deduplicate Check button is now created.
6. Add the Deduplicate Check button to your Custom Object Layout (optional)
- Still in the Object Manager and your Custom Object, navigate to the Page Layouts menu.
- Open the page layout where you want to add the Deduplicate Check button.
- From the Buttons or Mobile & Lightning Actions menu, drag and drop the Deduplicate Check button to the custom button section below, which will be highlighted in green when you drag the button.

 Click here to see a short video of this step
- Click Save. You have added the Deduplicate Check button to your custom object.
Here is an example of how it looks added to the custom object 'Price':
7. Create the Deduplicate Merge button (optional)
- Navigate to the Salesforce Setup - Custom Code - Visualforce Pages.
- Click New.
- At Label, enter a value, for example Deduplicate Merge Price, where 'Price' is your custom object.
- At Available for Lightning Experience, Lightning Communities, and the mobile app, set the checkbox to 'true'.
- At Visualforce Markup, replace all content with the markup below. Replace "*Object__c*" with the API name of your Custom Object.
<apex:page standardController="*Object__c*" extensions="dupcheck.dc3ControllerMergeList" recordSetVar="records" docType="html-5.0" sidebar="false"> <dupcheck:dc3MergeList records="{!allRecords}" selected="{!selectedRecords}"/> </apex:page> - Click Save.
- Now navigate to the Object Manager - your Custom Object - Buttons, Links, and Actions.
- Click New Button or Link.
- At Label, enter a value, for example Deduplicate Merge. This will be the label of the button users see in the User Interface.
- At Display type, select 'List Button'. The checkbox at Display Checkboxes should be set to 'true'.
- At Behavior, select 'Display in existing window with sidebar'.
- At Content Source, select 'Visualforce Page'.
- At Content, find the new Visualforce Page you just created.
- Click Save.

8. Add the Deduplicate Merge button to your List View (optional)
- Still in the Salesforce Setup > Object Manager > your custom object, go to List View Button Layout.
- At the list view you want to add the button to, click Edit.
- Move the 'Deduplicate Merge' button from Available Buttons to Selected Buttons.
- Click Save.
9. Add fields for Deduplicate Job results export (optional)
To be able to export Deduplicate Job results of a job that ran on your custom object, add two fields to the Plauti Deduplicate Duplicate (dupcheck__dc3Duplicate__c) object. See Deduplicate Job Export for Custom Objects on how to set this up.
10. Set up reparenting of Tasks and Events (optional)
After finding duplicate records in your custom object, you can merge them just like standard object records. However, because of platform limitations, related Tasks and Events that are recorded on custom object records via a custom lookup, cannot be moved to the master record upon merge. To solve this, use a Merge Plugin to reparent the Tasks and Events upon merge.
