Use the Create Task action to create an identical task for a number of records in one go. Select one or more users to assign the tasks to; create tasks for all users or divide them evenly.
Using the Action
To set up a Create Tasks action:
- Select the records you want to create tasks for to in a list view, or by creating a new job.
- In the Action Launcher (top right in list view, or the next window in the DAP Job modal), select Create Task and click Next.
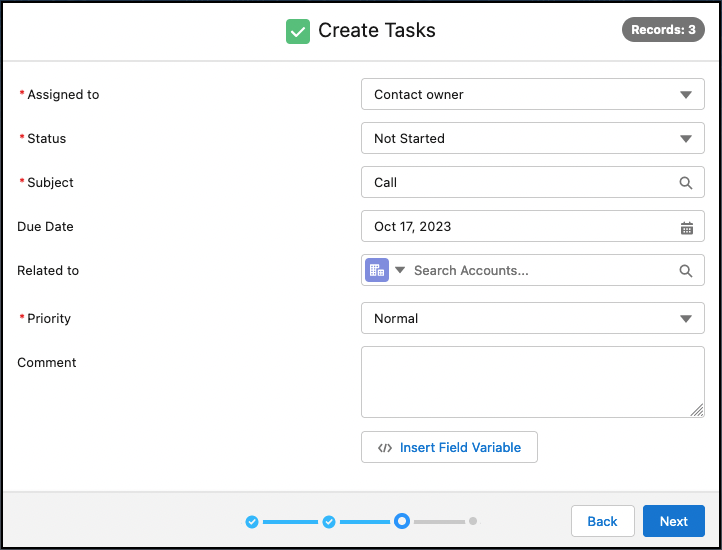
- In the next window, in the Assigned to field, select who the tasks should be assigned to. Choose between the object owner, the logged-in user, or specific users (Set User(s)).
The logged-in user is the user who executes the Create Tasks action.
With the Set User(s) option you can enter multiple users, groups, and queues. In that case, either one task is created per user / group-member / queue for all records, or the tasks are divided over the users (see next step). Select User, Group, or Queue in the select list, then search for a specific record.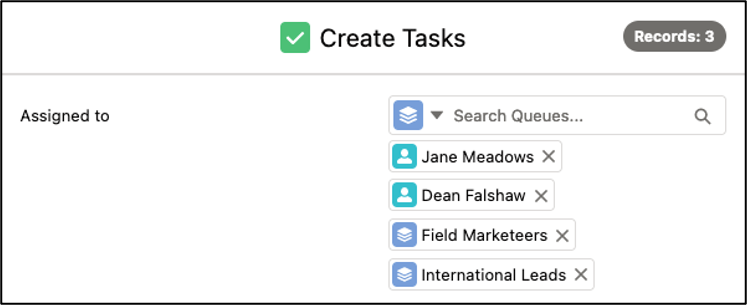
- When using the Set User(s) option, and adding two or more users, the field Assignment Method appears. Choose Create a Task for every user to create the same task for each of the selected users (per record a task is created for each selected user), or choose Divide Tasks via Round Robin to evenly divide the created tasks over the selected users (per record only one task is created, and these are divided over the selected users).
- When creating tasks for objects other than Leads or Contacts, you can add a contact in the Name field. The contact that you enter here does not need to be related to the records that you are creating tasks for.
- Select the Status that the tasks should have upon creation.
- Select a Subject or enter a different subject.
- Enter a Due Date. Pick one of the relative due dates (such as 'Week after task creation') when using the action in a Macro or Scheduled Job.
- When creating tasks for Contacts, you can add a relation in the Related to field. Select an Object in the select list, then search for a specific record.
- Select a Priority for the tasks.
- In the Comment field you can add a message for the users. Enter a text, and use field variables to personalize the message.
- Click Next.
- In the confirmation window, check the changes you will be making and click Start.
- If you ran the action from a list view: once the progress bar is at 100% completed, click Finish to return to the object overview.
If you ran the action as a Job, you are returned to the Job Overview, where you can view the job results information via the Info button.
You have now created new tasks for all selected records.
Use Case
Watch an example of how you can use the Create Tasks action:
