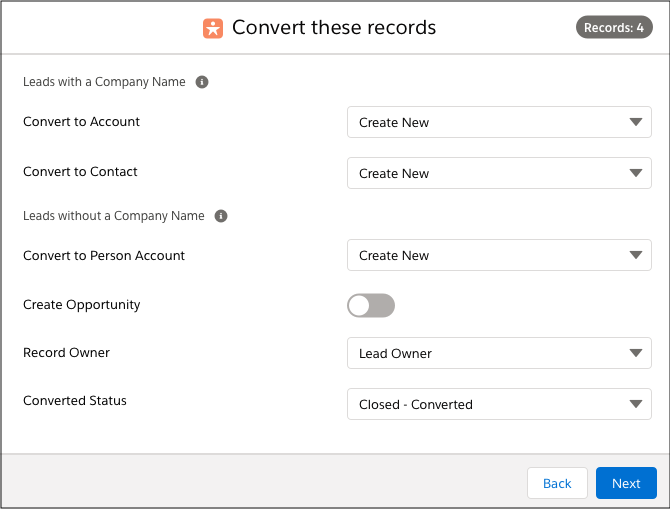
Use the Mass Convert action to quickly convert multiple Leads in one go. Leads with a Company Name filled in will convert to Accounts and Contacts. If you are using Person Accounts, Leads without a Company Name filled in will convert to Person Accounts.
Using the Action
- Select the records you want to convert in a list view, or by creating a new job.
- In the Action Launcher (top right in list view, or the next window in the DAP Job modal), select Mass Convert and click Next.
- In the next window, fill in the fields for the conversion. Depending on whether you only selected Leads with or without Company Name filled in, or both with and without, different fields will be shown.
For Leads with a Company Name filled in:
- Convert to Account: select ‘Create New’ to create new Accounts for all selected Leads based on the Lead Company Name. If you selected multiple Leads with the same Company Name, multiple Accounts with that name will be created. Or select ‘Choose Existing’ to add all selected Leads to an existing account. If available, select a Record Type as well.
- Convert to Contact: select ‘Create New’ to create new contacts based on the Lead Name, or ‘Choose Existing’ to add all selected Leads to an existing Contact. With ‘Choose Existing’ the parent account is updated, except when Shared Contacts is enabled.
Please note: if you chose an existing account to convert to, you can only select contacts from that account at Convert to Contact > Choose Existing. However, if you have Salesforce’s Shared Contacts option enabled, you can select contacts from any account.
For Leads without a Company Name filled in:
- Convert to Person Account: select ‘Create New’ to create new Person Accounts for all selected Leads based on the Lead Name, or ‘Choose Existing’ to add all selected Leads to an existing Person Account. If available, select a Record Type as well.
For all Leads:
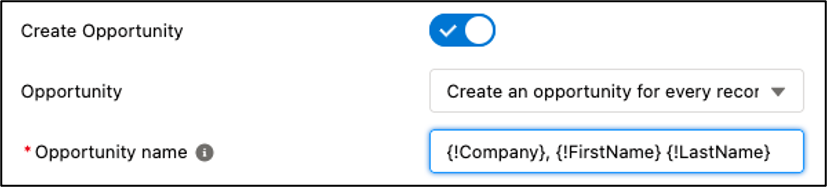
- Create Opportunity: if you want, bulk create an opportunity as well. Select whether you want to create a separate opportunity for each selected Lead or a single opportunity with all selected Leads linked, or if you want to link the Leads to an existing opportunity. When creating an opportunity for every record, you can set different names for each opportunity by referring to a field value on the Lead records. By default, this is the Company Name, indicated with the API field name for that field: {!Company} . In the same way, you can also use the value of other fields from the Lead record as the opportunity name, by entering their API field name. For example, to use both the Company Name and the Lead Name as name for the opportunities, in the format of ‘United Solar, Jim Breen’, enter {!Company}, {!FirstName} {!LastName}
- Record Owner for new records: indicate who will be the owner of any newly created records. Choose between the Lead Owner or the logged-in user who is performing the action, or select a user with the option Set Owner. This field is not visible when you convert to existing accounts, contacts, and opportunities.
- Converted Status: select a status for the converted Lead records.
Click Next.
- In the confirmation window, check the details for the leads that will be converted, and click Start.
- If you ran the action from a list view: once the progress bar is at 100% completed, click Finish to return to the object overview.
If you ran the action as a Job, you are returned to the Job Overview, where you can view the job results information via the Info button.
You have now converted all selected Lead records.
Use Case
Watch an example of how you can use the Mass Convert action:
