Applying Plauti Verify to your Objects
Do you want to use Plauti Verify for an Object (standard or custom) other than Lead, Contact or Account? Use this guide to configure Plauti Verify for your other Objects.
1 Add your Object to Verify Setup
In Plauti Verify, go to tab Verify Setup.
At left, select Object Configuration.
At right, click Add Object.
Find the Object you wish to configure and click Save.
Plauti Verify can work with any Object in Salesforce.
2 Map your field sets for Address, Email and Phone
- Still in Object Configuration, at the Object you just added, click Configure.
- At the Address, Email, and Phone tabs, map the fields you want to use with Plauti Verify.
3 Override your 'New' and 'Edit' buttons
Deploy Verify Entry for the 'New' and 'Edit' buttons on the Object's record pages.
Read how to do this in detail in How to deploy the Plauti Verify Entry page.
In short:
- In Salesforce Setup > Object Manager, find your Object.
- Go to Buttons, Links and Actions.
- Find the 'Edit' button and click Edit.
- At 'Lightning Experience Override', select Lightning Component.
- In the select list, pick
recordval:recordForm. - Click Save.
- Repeat for the 'New' button.
If in the 'Lightning Component' select list one of the 'dupcheck' forms is already selected, change to the 'recordval' form and follow the instructions in Integrate Duplicate Check with Record Validation on how to use Plauti Verify in combination with Plauti Deduplicate.
4 Create the custom field 'Verify Record Status'
Create a custom picklist field 'Verify Record Status'. Without this field Plauti Verify will not work for this Object.
In Salesforce Setup > Object Manager, find your Object.
At left, go to Fields & Relationships
Click New
 to add a new field.
As Data Type, choose Picklist and click Next.
Enter only the following information:
Field Label:
Verify Record Status.
Values: Select 'Use global picklist value set'.
In the drop-down menu, select Verify Record Status.
Field Name: Change torv2Status.
Then click Next.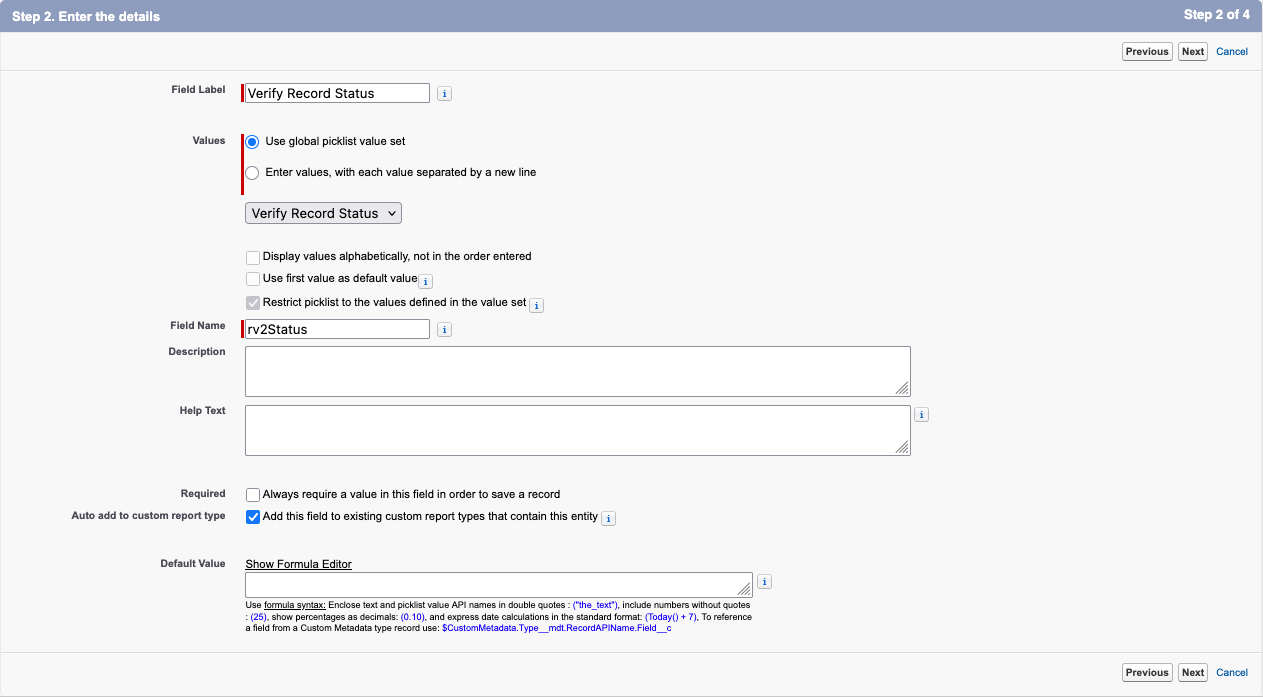
Depending on your Salesforce edition, you will now get a screen to establish field-level security. Click Next.
Depending on your Salesforce edition, you will now get a screen where you can add the field to the page layout. Since this is a background process, this should not be applied to any page layout. Uncheck any page layout and click Save.
Now, after creating the 'Verify Record Status' field, you need to map it in Verify Setup.
Go to the Plauti Verify app > tab Verify Setup.
At left, select Object Configuration.
At the Object, click Configure
 .
.The Object's Configuration page opens on its Settings tab. Click Configure
 .
.In the Field Configuration section, at Status Field, select the 'Verify Record Status' field you just created. Then click Save.
5 Create the custom field 'Verify Validation Result'
Create a custom long text area field 'Verify Validation Result'. Without this field Plauti Verify will not work for this Object.
In Salesforce Setup > Object Manager, find your Object again.
At left, go to Fields & Relationships
Click New
to add a new field.As Data Type, choose Text Area(Long) and click Next.
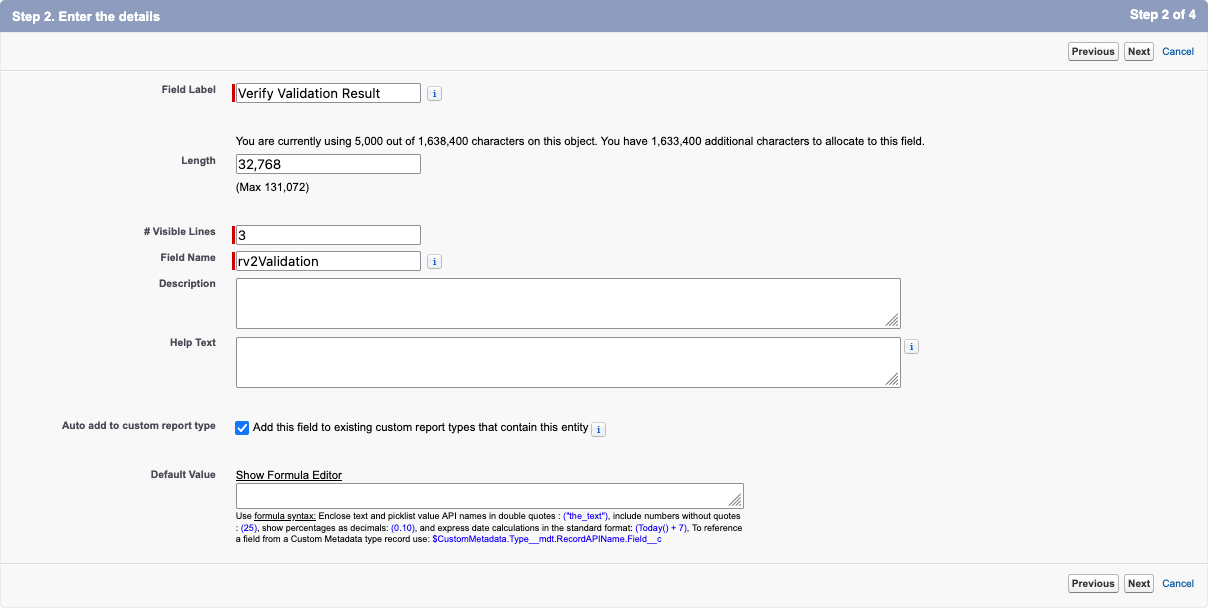
Enter only the following information:
Field Label:
Verify Validation Result.
Field Name: Change torv2Validation.
Then click Next.
Depending on your Salesforce edition, you will now get a screen to establish field-level security. Click Next.
Depending on your Salesforce edition, you will now get a screen where you are able to add the field to the page layout. Since this is a background process, this should not be applied to any page layout.
Uncheck any page layout and click Save.
Now, after creating the 'Verify Validation Result' field, you need to map it in Verify Setup.
Go to the Plauti Verify app > tab Verify Setup.
At left, select Object Configuration.
At the Object, click Configure
.The Object's Configuration page opens on its Settings tab. Click Configure
.In the Field Configuration section, at Status Field, select the 'Verify Validation Result' field you just created. Then click Save.
6 Create the Apex Trigger (mandatory)
As per Salesforce policy, you first need to create the Apex Trigger in your sandbox and then deploy from sandbox to production.
- Go to the Salesforce Setup > Object Manager.
- In the Object Manager, find the custom object you want to use and click on it.
- Under Details, copy the API Name of the Object.
- At the left, go to the Triggers tab.
- At top right, click New.
- Replace all code in the box with the Apex Trigger code below. Make sure you replace
*OBJECTNAME*and*OBJECTAPINAME*with the name and API name of your Custom Object.
Click here to watch a short video of this step.trigger rv2*OBJECTNAME* on *OBJECTAPINAME* (after delete, after insert, after undelete, after update, before delete, before insert, before update) { if (!recordval.rv2Trigger.triggerSource.equalsIgnoreCase('SELF') || recordval.rv2TriggerMapper.isTriggerDisabled()) { return; } recordval.rv2Trigger triggerProcess = recordval.rv2TriggerMapper.get('*OBJECTAPINAME*', 'rv2Status__c', 'rv2Validation__c'); triggerProcess.execute(trigger.new, trigger.oldMap,trigger.isBefore, trigger.isAfter, trigger.isInsert, trigger.isUpdate, trigger.isDelete, trigger.isUndelete); } - Click Save.
The trigger has been created.
As per Salesforce policy, you first need to create the Apex Trigger in your sandbox and then deploy from sandbox to production.
That's it! You have now configured Plauti Verify for your Object. You can now start validating your records. Check out our Usage Guide to find out more.