To add the Action Launcher to objects other than Leads, Accounts, or Contacts, you first need to create a Visualforce page and a custom button for that object.
First, create a Visualforce page for the object:
- Go to the Setup
- Find Visualforce Pages and open it.
- Click New.
- For Label, enter a label to identify the Action Launcher Visualforce page with, for example Action Launcher.
- For Name, enter a name to identify the page in the API. We recommend including the Object name, as you might be creating several Visualforce pages for different objects. For example, if you are creating a Visualforce page and custom button for Cases, enter the name dapCaseActionLauncher .
- Select Available for Lightning Experience, Experience Builder sites, and the mobile app.
- Leave Require CSRF protection on GET requests unticked.
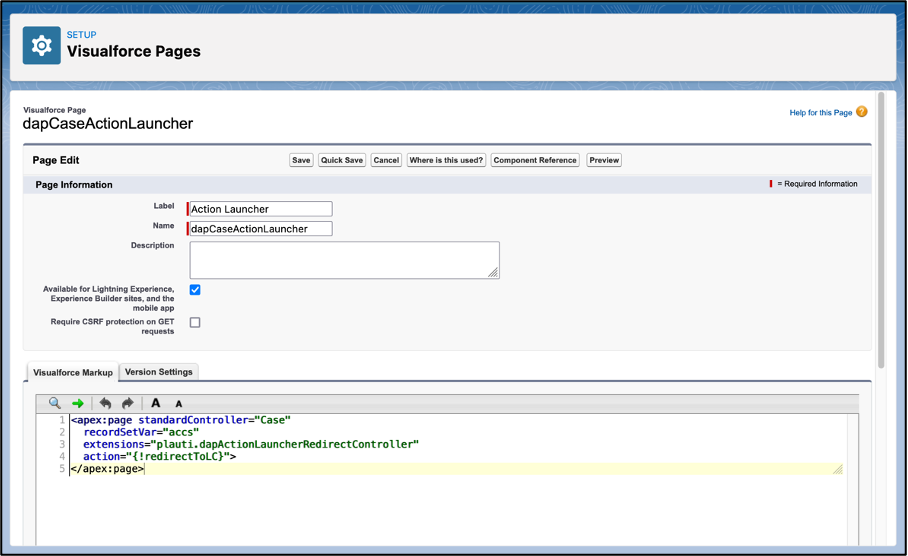
- In the Visualforce Markup text box, enter the following code:
<apex:page
  standardController="OBJECT"
  recordSetVar="accs"
  extensions="plauti.dapActionLauncherRedirectController"
  action="{!redirectToLC}">
</apex:page>
where you replace OBJECT by the object API name. For example, if you are creating a Visualforce page and custom button for Cases, the code would be as follows:
<apex:page
  standardController="Case"
  recordSetVar="accs"
  extensions="plauti.dapActionLauncherRedirectController"
  action="{!redirectToLC}">
</apex:page>- Click Save.
- Make sure that your non-SystemAdministator profiles also have access to this Visualforce page.
Then, create a custom button for the object:
- Go to the Setup.
- Find the Object Manager and open it.
- Find the object where you want to add the Action Launcher and click to open it.
- In the left-hand panel, click Buttons and Links, or Buttons, Links, and Actions.
- Click New Button or Link in the top right-hand corner.
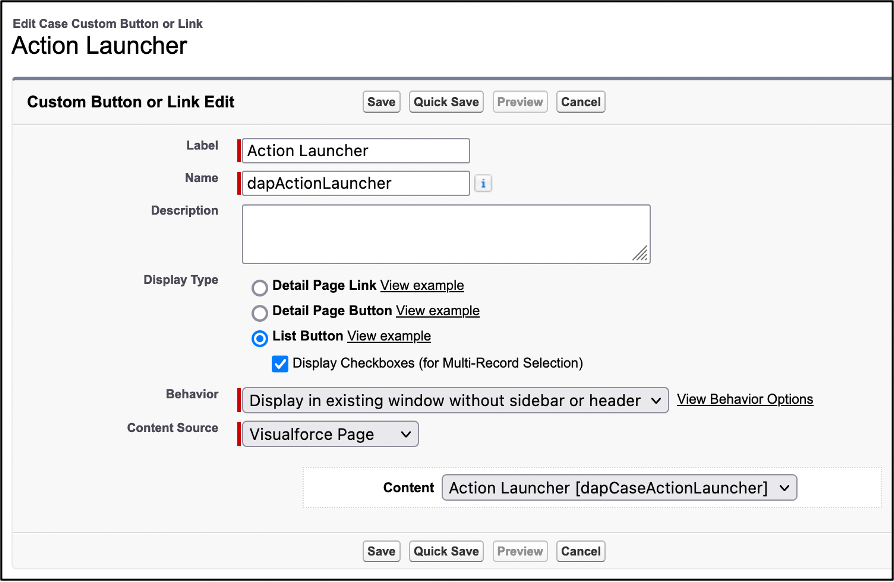
- The New Button or Link card opens. Enter the following data:
- Label: Action Launcher
- Name: dapActionLauncher
- Display Type: List Button
- Tick ‘Display Checkboxes (for Multi-Record Selection)’
- Behavior: Display in existing window without sidebar or header
- Content Source: Visualforce Page
- Visualforce Page: if not automatically added, add the Visualforce page that you created earlier
- Click Save.
- After creating the custom button for an object, follow the steps in Add the Action Launcher to Leads, Accounts and Contacts to add the Action Launcher to the object.
- Repeat for other objects where you want to use the Action Launcher.
